

What is Account Sharing?
Sharing account credentials is a common practice among users, particularly as the costs of services continue to rise. It usually starts with a family member or friend sharing access to a streaming service or other subscription by sharing their password. However, what may seem like an innocent act can have serious consequences, such as exposing personal data or unauthorized access to user accounts by malicious actors as the accounts get passed around.
This can also lead to reduced revenue for businesses due to shared subscriptions, which we discuss in detail in our ultimate guide to account sharing. Experts estimate that the revenue lost due to password sharing will reach $12.5 billion by 2024, making it a top priority for many businesses.
Why is Account Sharing Prevention Important?
Measuring and understanding user behavior related to account sharing is incredibly important for most businesses. There are several reasons why, including:
Lost Revenue
Account sharing can cause substantial revenue losses for businesses, particularly those operating on a subscription-based model like Disney+ or Spotify. For example, according to a study by CordCutting, streaming services lose hundreds of millions of dollars yearly due to password sharing.
Inaccurate or Reduced User Metrics
Account sharing undermines the accuracy of user data, making it challenging to comprehend user behavior, preferences, and usage patterns. This unreliable data can misguide businesses, leading to uninformed decisions.
Increased Security Risk for Users
The more people with access to a single account, the greater the risk of a security breach. It is not uncommon for credentials shared with friends or family to end up in the hands of malicious individuals.
Account Ownership Claims
Determining the account's rightful owner can become complex in account sharing situations, particularly in disputes or fraud. This can result in challenges for customer service and legal complications that require both time and resources to resolve.
How to Increase Revenue by Identifying & Preventing Account Sharing
Fingerprint Identification provides a unique identifier for every visitor to your website. This identifier is collected behind the scenes whenever someone performs a specific action with our JavaScript fingerprinting agent installed. To ensure data integrity, Fingerprint also offers tools to validate these identifiers sent by your front end. Using these features can protect your business and easily detect account sharing users.
Since you know your product and business landscape best, it is up to you to configure account-sharing prevention workflows using the visitor ID to detect account sharing on your website. Below, we provide some steps and best practices that can serve as a starting point for your custom solution.
Policy Formulation
Establish a clear policy regarding account sharing and the maximum number of devices or browsers allowed per account within a specific time. If applicable, also specify the maximum number of devices or browsers allowed to be used concurrently. This policy should be communicated to users during signup and within the Terms of Service.
Device and Browser Registration
Collect and store the visitor ID alongside account information to register devices or browsers upon login. Additionally, you could allow users to register and manage a limited list of trusted devices/browsers through their account settings.
Monitoring and Analytics
Continuously monitor and analyze login patterns to identify unusual behavior, such as multiple logins from different devices or browsers in a short period or simultaneous logins from geographically dispersed locations.
Take Action
If an account exceeds the set threshold, take appropriate actions based on your policy. This may include sending alerts to the user, flagging the account, or imposing temporary restrictions such as limiting access to the account.
Tutorial: Use Fingerprint to Prevent Account Sharing
In this tutorial, you will learn how to integrate Fingerprint into your web application and use it to detect if multiple browsers or devices are accessing the same user account. Using a streaming service page as an example, you will prevent users from using a single account on multiple devices.
You can try the final result on our website. The code snippets in the article are simplified for readability but the full code is open-sourced on GitHub.
In this tutorial, we will only allow a single device to access the account at a time, but this is just an example. In the real world, you should consider your specific business needs and tweak both the account sharing detection logic and the actions taken when a visitor is flagged.
1. Identify visitors when they log in
We recommend identifying every visitor on login and sending the visitorId and requestId to your application server, where they persist in the storage layer. Using this data, you can compare the current visitorId and credential pairing to previous account access to detect account sharing.
To begin, sign up for a Fingerprint account and install the Fingerprint JavaScript agent in your web application. If you are using a frontend framework like React, Angular, or Vue, you can use one of our frontend libraries which have caching and other useful features built in.
// src/app/account-sharing/AccountSharing.tsx
// Initialize the agent.
const fpPromise = import("https://fpjscdn.net/v3/<your-public-api-key>").then(
  (FingerprintJS) =>
    FingerprintJS.load({
      endpoint: "https://metrics.yourdomain.com",
    })
);
Note: For production deployments, we recommend routing requests to Fingerprint's APIs through your domain using the endpoint parameter. This prevents ad blockers from disrupting identification requests and improves accuracy. We offer a variety of ways to do this, which you can learn more about in our guide on how to protect your JavaScript agent from ad blockers.
Let's use a streaming service login page as an example:
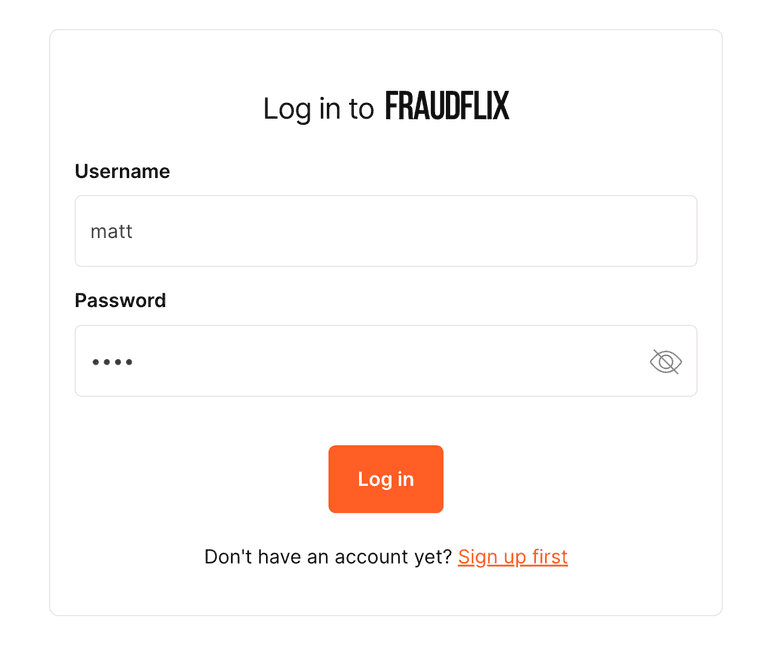
When the user attempts to log in, make an identification request and send the requestId along with the user’s credentials to your authentication API.
// src/app/account-sharing/AccountSharing.tsx
async function login() {
  // Collect browser signals and request visitor identification
  // from the Fingerprint API. The response contains a `requestId`.
  const { requestId } = await (await fpPromise).get();

  // Send the user’s credentials together with
  // the `requestId` to your authentication API.
  const loginData = {
    userName,
    password,
    requestId,
  };
  const response = await fetch('/account-sharing/api/login', {
    method: "POST",
    body: JSON.stringify(loginData),
    headers: {
      "Content-Type": "application/json",
    },
  });
  return await response.json();
}
2. Retrieve and validate Fingerprint results on the server
In the login route handler on the server, use the requestId to get the full identification results from Fingerprint Server API and validate its authenticity. If the request ID is not found or some of its data is inconsistent, return an error instead of logging the user in.
// src/app/account-sharing/api/login/route.ts
export async function POST(req: Request): Promise<Response> {
  const { username, password, requestId } = (await req.json());

  // Get the full Identification result from Fingerprint Server API and validate its authenticity
  const fingerprintResult = await getAndValidateFingerprintResult({
    requestId,
    req,
  });
  if (!fingerprintResult.okay) {
    return NextResponse.json(
      { message: fingerprintResult.error, severity: 'error' },
      { status: 403 },
    );
  }
}
You can call the Server API /events endpoint directly or use one of our Server SDKs.
Here is an example using the Server API via the Node SDK:
// src/server/checks.ts
import {
  EventResponse,
  FingerprintJsServerApiClient,
  isEventError,
} from '@fingerprintjs/fingerprintjs-pro-server-api';

export const getAndValidateFingerprintResult = async (
  requestId: string,
  request: Request,
): Promise<{ okay: boolean; data?: EventResponse, error?: string }> => {
  // The Server API must contain information about this specific identification request.
  let identificationEvent: EventResponse;
  try {
    const client = new FingerprintJsServerApiClient({ apiKey: SERVER_API_KEY });
    identificationEvent = await client.getEvent(requestId);
  } catch (error) {
    if (isEventError(error) && error.status === 404) {
      return { okay: false, error: 'Request ID not found, potential spoofing attack.' };
    }
    return { okay: false, error: String(error) };
  }

  const identification = identificationEvent.products?.identification?.data;
  // More checks...
  return { okay: true, data: identificationEvent}
}
Note: You can also use Webhooks or Sealed results (Enterprise plan only) instead of Server API to process and validate identification results in a server environment.
To prevent client-side tampering and replay attacks, you should also check that:
- The identification request timestamp is fresh.
- The identification request IP is consistent with the login request.
- The identification request came from the expected origin.
- Smart signals of the identification request don't show any anomalies, for example, bot usage or browser tampering.
For more details see the Protecting from client-side tampering guide in our documentation or reference the full implementation of the getAndValidateFingerprintResult function in the GitHub repository.
3. Limit how many devices can access an account at the same time
Having validated the authenticity of the identification event, you can verify the user's credentials:
// src/app/account-sharing/api/login/route.ts
const account = await UserDbModel.findOne({ where: { username } });
if (!account || hashString(password) === account.passwordHash) {
  return NextResponse.json(
    {
      message: "User not found or incorrect password",
      severity: 'error',
    },
    { status: 401 },
  );
}
Then you can see how many visitor IDs have already accessed that account in a given time period. The exact logic will depend on your business requirements.
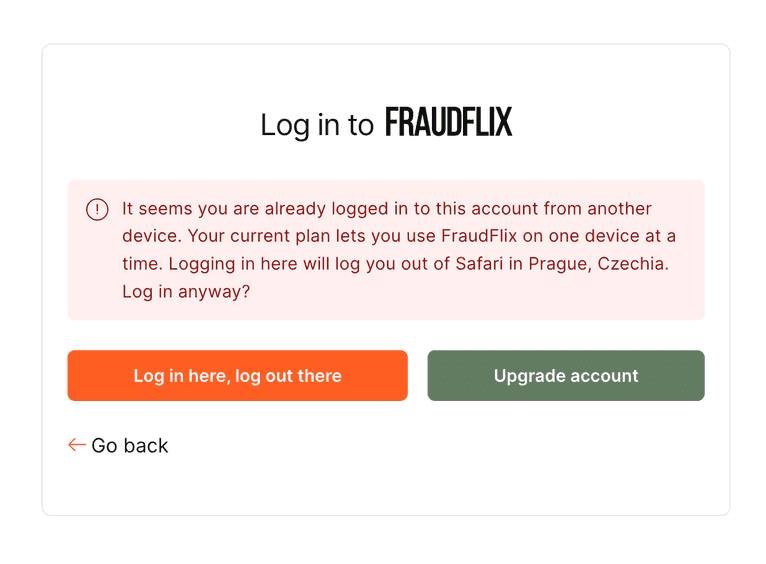
In this demo, we will just check if there is any other device logged in right now. If there is, we return an error message to ask the user if they want to force-login using this device and log out of the other one.
// src/app/account-sharing/api/login/route.ts
// Check if the user is already logged in on another device
const loggedInDevices = await SessionDbModel.findAll({
  where: { username }
});
const anotherDevice = loggedInDevices[0];
const alreadyLoggedInAnotherDevice =
  loggedInDevices.length >= 1 && anotherDevice.visitorId !== visitorId;
if (alreadyLoggedInAnotherDevice && !forceLogin) {
  return NextResponse.json(
    {
      message: `
        You are already logged in to this account from another device.
        Logging in here will log you out of ${anotherDevice.deviceName}.
        Log in anyway?`,
      severity: 'error',
    },
    { status: 409 },
  );
}
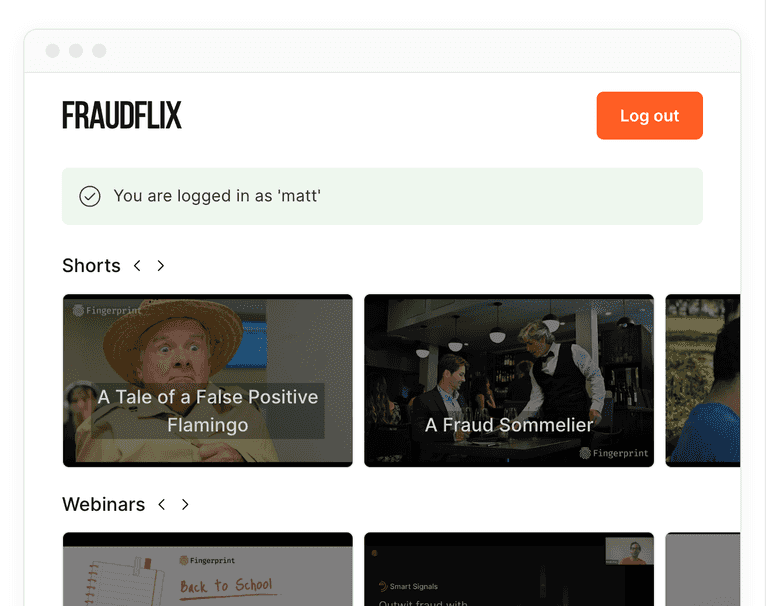
If the user isn't logged into another device, or they chose to force-login into this one, delete the other session and create a new one for this visitor ID. Then return a successful response:
// src/app/account-sharing/api/login/route.ts
await SessionDbModel.destroy({ where: { username } });
await SessionDbModel.create({
  visitorId,
  username,
  deviceName,
  deviceLocation,
});

return NextResponse.json(
  { message: 'Login successful', severity: 'success' },
  { status: 200 },
);
Explore our Account Sharing Prevention Demo
Visit the Account Sharing Prevention Demo we built to demonstrate the concepts above. You can explore the open-source code on Github or run it in your browser with CodeSandbox. The core of the use case is implemented in this component and this endpoint.
Conclusion
This guide provides a foundation for starting your journey towards preventing account sharing effectively. While it outlines the main steps, it is not exhaustive, and there are additional details to consider when creating a comprehensive workflow. Nonetheless, it should serve as a starting point for understanding the essential procedures. For more information on how Fingerprint Identification can improve your account sharing detection, we encourage you to explore our documentation or contact our support team.
FAQ
Account sharing involves users granting access to their accounts to other people, violating terms of service and potentially leading to revenue loss for the service provider.
Businesses can detect account sharing by monitoring unusual access patterns, such as simultaneous logins from different locations, and analyzing usage patterns that don't match typical user behavior.


