Multi-factor authentication (MFA) improves website security by requiring additional and different forms of authentication to log in, such as a one-time passcode. It protects against threats such as leaked credentials, guessed passwords, and unlocked devices.
The drawback of MFA is user frustration, as users must perform extra authentication steps every time. To avoid this problem, you can offer a “remember my device” option that skips the check for future logins for a specified amount of time.
We’ll discuss when it is appropriate to offer “remember my device” to your users and walk through how to use Fingerprint's device intelligence to implement it on an existing login page.
When to use “remember my device”
“Remember my device” trades security for convenience. While MFA with "remember my device" is useful for thwarting distant hackers, it won’t stop someone else who can get physical access, for example, to an unattended computer in the workplace.
For situations requiring top security levels, such as transferring money or accessing production systems, enforcing MFA on each login makes sense. For most uses, however, "remember my device" offers enough security while reducing a common pain point for users.
Mechanisms to remember a device
When choosing the technology to remember a user’s device, there are a couple of options you can consider:
- Browser cookies: Here, a first-party cookie acts as a device identifier. The cookie must be generated on the server and verified in subsequent logins so an attacker cannot spoof it.
- Device identification: Create a unique profile based on details about the device, and then send that as an identifier.
In both options, the device identifies itself, and on the server, you can match that identifier with a previous successful MFA to determine if they can skip the check.
Using cookies is a standard and reasonable choice. It works well, but there are some slight advantages to using device identification instead (or in addition) to cookies:
- Device identification is generated from persistent information (e.g., browser capabilities), so it cannot be discarded by deleting the browser cache.
- You can send the device identification data to any domain your servers run on, whereas with first-party cookies, you can only send them to the domain that created them.
Fingerprint offers reliable device identification that cannot be spoofed. It works by performing analysis on the device and using advanced server techniques, so it can provide accurate identification even on incognito devices. This makes it ideal for "remember my device" and many other use cases.
In addition to device identification, Fingerprint offers Smart Signals that can help you establish a visitor's trustworthiness. These signals include bot detection, VPN and virtual machine detection, and more.
We will now deep dive into how to implement a “remember my device” feature with Fingerprint device identification.
Tutorial: How to implement “remember my device” for MFA sites.
In this tutorial, we’ll add the "remember my device" capability to an existing app. This app has a login page that requires MFA on every login. Using Fingerprint’s visitor ID, we will query which devices have previously passed an MFA check and opted in to "remember my device."
Existing app that requires MFA on every login
To set the scene, we will look at the code for the initial Node.js app without "remember my device."
It takes the user through a two-step process:
- First, the page asks for a username and password
- Once these are verified, it will ask for a one-time password (OTP) to complete the login
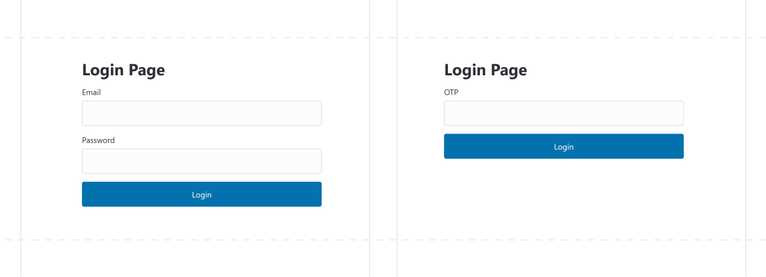
Here is the HTML for the login page, which has all the elements required for both traditional and MFA login steps:
<!DOCTYPE html>
<html>
  <head>
    <title>Login Page</title>
    <link
      rel="stylesheet"
      href="https://cdn.jsdelivr.net/npm/@picocss/pico@2/css/pico.min.css"
    />
  </head>
  <body class="container">
    <h1>Login Page</h1>
    <form>
      <div id="step1">
        <label for="email">Email</label>
        <input type="email" id="email" name="email" />
        <label for="password">Password</label>
        <input type="password" id="password" name="password" />
      </div>
      <div id="step2" style="display: none">
        <label for="otp">One time password</label>
        <input type="text" id="otp" name="otp" />
      </div>
      <mark id="validation-result" style="display: none; color: red"></mark>
      <button type="submit">Login</button>
    </form>
  </body>
</html>
We can add the script below to the HTML to implement the two-step process. It calls a server endpoint /login that handles both the password authentication step and the OTP authentication step. The script displays the form elements appropriate to the current step.
<script>
    let currentOtpData = null;

    function setShowingOtp(otpData) {
      currentOtpData = otpData;
      if (currentOtpData) {
        document.getElementById("otp").value = "";
      }
      document.getElementById("step1").style.display = currentOtpData
        ? "none"
        : "block";
      document.getElementById("step2").style.display = currentOtpData
        ? "block"
        : "none";
    }

    function setValidationMessage(message) {
      document.getElementById("validation-result").textContent = message;
      document.getElementById("validation-result").style.display = message
        ? "block"
        : "none";
    }

    const form = document.querySelector("form");
    form.addEventListener("submit", async (e) => {
      e.preventDefault();
      setValidationMessage("");

      // Adjust login based on if we are at step 1 (email and password) or step 2 (OTP)
      const loginData = currentOtpData
        ? {
            email: document.getElementById("email").value,
            otpToken: currentOtpData?.otpToken,
            otp: document.getElementById("otp").value,
          }
        : {
            email: document.getElementById("email").value,
            password: document.getElementById("password").value,
          };

      const response = await fetch("/login", {
        method: "POST",
        headers: {
          "Content-Type": "application/json",
        },
        body: JSON.stringify(loginData),
      });

      const responseData = await response.json();

      switch (responseData.result) {
        case "otpchallenge":
          setShowingOtp(responseData);
          break;
        case "fail":
          setValidationMessage(responseData.message);
          responseData.message;
          break;
        case "success":
          window.location.href = "/success";
          break;
      }
    });
</script>
The back-end code below runs a server that provides the endpoint /login. (The authentication functions are mocked in this example to make it easier to run on your local machine.)
To avoid sending the password again after it is verified, the server returns an OTP token that proves that the password check is done, and that only an OTP is required to complete the login.
// app.js
const express = require("express");
const app = express();
const port = 3000;
app.use(express.json());
app.get("/success", (req, res) => {
res.sendFile(__dirname + "/success.html");
});
app.get("/", (req, res) => {
res.sendFile(__dirname + "/index.html");
});
// The following four security functions are demo implementations
// to make the tutorial easier to run locally.
function verifyPassword(email, password) {
return password === "good";
}
function createOTPLoginToken(email) {
const expiresAt = new Date();
expiresAt.setMinutes(expiresAt.getMinutes() + 10);
return { otpToken: "df951061-8e5e-42a2-acdd-494e15e9b546", expiresAt };
}
function verifyOTP(email, otpToken, otp) {
if (otpToken === "df951061-8e5e-42a2-acdd-494e15e9b546" && otp === "123456") {
return true;
}
return false;
}
function createSession(email) {
return "dee060c4-b5ca-4e46-bbc9-4d31aeb32085";
}
app.post("/login", async (req, res) => {
const { email, password, otpToken, otp } = req.body;
if (password) {
if (!verifyPassword(email, password)) {
res.status(401).send({ result: "fail", message: "Email or password are incorrect" });
return;
}
const token = createOTPLoginToken(email);
res.status(200).send({ result: "otpchallenge", ...token });
return
}
if (otp) {
const otpOK = verifyOTP(email, otpToken, otp)
if (otpOK) {
const session = createSession(email);
res.status(200).send({ result: "success", session });
return
}
res.status(401).send({ result: "fail", message: "OTP is incorrect or has expired" });
return
}
res.status(400).send({ result: "fail", message: "Invalid request" });
return
});
app.listen(port, () => {
console.log(`Server running at http://localhost:${port}`);
});
app.on("error", (err) => {
console.error(err);
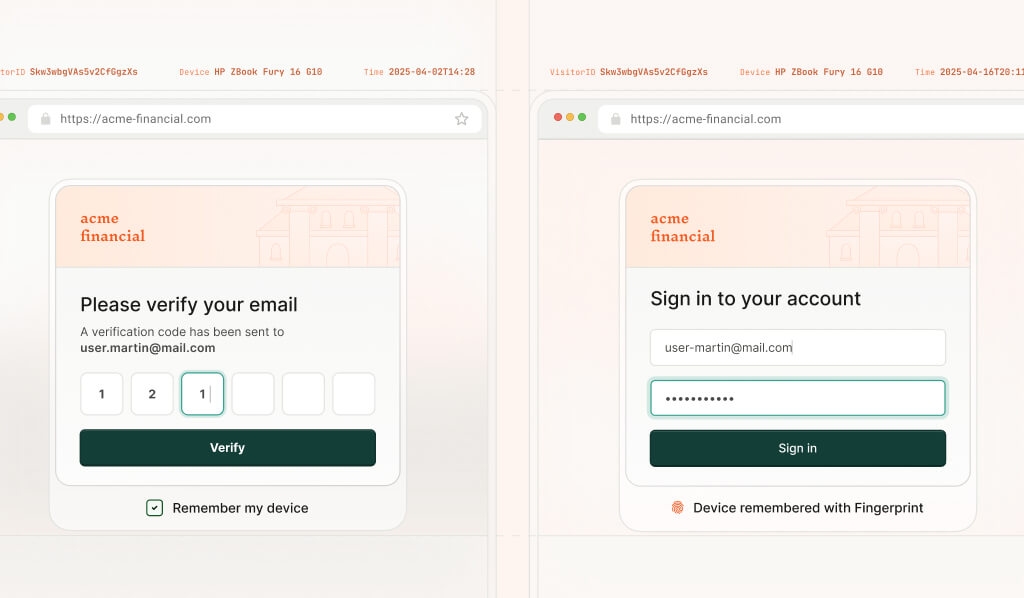
});Once the code is run, you can visit http://localhost:3000 and see a page like the first screenshot below, followed by the second screenshot after you submit your username and password. To try the login flow, enter any email, the password “good” and the OTP “123456”.
Using device intelligence for "remember my device"
We will use Fingerprint to provide the "remember my device" feature. Fingerprint provides a device identifier called a visitor ID, which we will store in a database to identify devices that have elected to be remembered.
On the front end, the Fingerprint JavaScript library will identify the device, and call Fingerprint to obtain a request ID — a unique identifier that the server can use to get details about the device.
On the server, we use the Fingerprint Server API with the request ID to get the device identifier (called visitor ID). With the visitor ID, we can decide whether to skip the MFA step.
First, let’s add the appropriate Fingerprint libraries on both the web page and the server. If you don’t have a Fingerprint account, sign up for a free trial. Now, create a secret API key. We will use both the public and secret API keys in the code to integrate with Fingerprint.
Add the following code in the HTML just below the script tag to load the Fingerprint client agent library. Replace the Public API Key with your public key shown in the Fingerprint dashboard.
<script>
    const fpPromise = import('https://fpjscdn.net/v3/<<Public API Key>>')
      .then(FingerprintJS => FingerprintJS.load())
Also, add these three lines near the beginning of the submit handler to obtain the request ID:
    form.addEventListener("submit", async (e) => {
      e.preventDefault();
      setValidationMessage("");

      // Add these three lines
      const fp = await fpPromise;
      const result = await fp.get();
      const requestId = result.requestId;
On the server, install the fingerprintjs library:
npm install @fingerprintjs/fingerprintjs-pro-server-apiAnd add this code to the top of app.js to load and initialize the server client. Set the API key and change the region to match your workspace region.
// app.js

const {
  FingerprintJsServerApiClient,
  Region,
} = require('@fingerprintjs/fingerprintjs-pro-server-api')

const client = new FingerprintJsServerApiClient({
  apiKey: '<<Private API Key>>',
  region: Region.Global
})
We can now add a checkbox during the MFA step that allows the user to ask that we remember the device. We pass their preference along with the request ID in our fetch request:
     <label for="rememberDevice">Remember my device</label>
        <input type="checkbox" id="rememberDevice" name="rememberDevice" />

…

     const loginData = currentOtpData
        ? {
            email: document.getElementById("email").value,
            otpToken: currentOtpData?.otpToken,
            otp: document.getElementById("otp").value,

// Add these two values: >>>
            requestId,
            rememberDevice: document.getElementById("rememberDevice").checked,
// <<<
          }
        : {
            email: document.getElementById("email").value,
            password: document.getElementById("password").value,
          };
On the server, if the OTP is correct and rememberDevice is true, we will add their visitorID to the database:
// Add this function
async function storeRememberDevice(email, requestId) {
  // Use the request ID, which represents a specific user request to get the
  // Fingerprint event, that contains the device intelligence data:
  const event = await client.getEvent(requestId);

  // From the data, extract the visitor ID - a unique identifier for the device
  const visitorId = event.products.identification.data.visitorId;

  try {
    const query = `
      INSERT INTO rememberedDevices (email, visitorId, timestamp)
      VALUES ($1, $2, now())`;
    await pool.query(query, [email, visitorId]);
  } catch (err) {
    // Error could be logged here, but we don't want to stop the current flow if this fails.
  }
}

…


app.post("/login", async (req, res) => {
  // Add the 2 new variables rememberDevice and requestId:
  const { email, password, otpToken, otp, rememberDevice, requestId } = req.body;

…


  if (otp) {
    const otpOK = verifyOTP(email, otpToken, otp);

    if (otpOK) {
      const session = createSession(email);

      // Add these lines to call "remember my device" when
      // requested and OTP is successful
      if (rememberDevice) {
        await storeRememberDevice(email, requestId);
      }

      res.status(200).send({ result: "success", session });
      return;
    }
With the user’s choice stored in the database, we can now honor it on their next visit from that device. To do this, we first add the request ID in our password login step:
…

       : {
            email: document.getElementById("email").value,
            password: document.getElementById("password").value,
            requestId,
          };
On the back-end, we use the request ID to see if they have a "remember my device" record from the last 14 days. If yes, we can skip the MFA check:
async function deviceIsRemembered(email, requestId) {
  // Use the request ID, which represents a specific user request to get the
  // Fingerprint event, that contains the device intelligence data:
  const event = await client.getEvent(requestId);

  // From the data, extract the visitor ID - a unique identifier for the device
  const visitorId = event.products.identification.data.visitorId;

  try {
    const query = `
      SELECT * FROM rememberedDevices
      WHERE email = $1 AND visitorId = $2 AND timestamp > now() - INTERVAL '14 day'`;

    const result = await pool.query(query, [email, visitorId]);
    return result.rows.length > 0;
  } catch (err) {
    // Error could be logged here, but we don't want to stop the current flow if this fails.
    return false;
  }
}

…

    const token = createOTPLoginToken(email);

    if (await deviceIsRemembered(email, requestId)) {
      res.status(200).send({ result: "success", session: createSession(email) });
    } else {
      res.status(200).send({ result: "otpchallenge", ...token });
    }
We will now skip the MFA step when the user has requested "remember my device" from a recognized device within the last 14 days.
Key takeaways
MFA is a powerful approach to improving website security, but it comes at the cost of user convenience. One way to improve the user experience is to offer a "remember my device" option to avoid further MFA prompts over some period of time, which is an acceptable balance of security and convenience in most cases.
Device intelligence allows you to recognize a device reliably and consistently, making "remember my device" straightforward to implement on your site, as shown in the tutorial. We used Fingerprint to make a login page, remember the user’s device, and reduce MFA requests.
Learn more about device intelligence and Fingerprint in our Getting Started Guide, or contact our team to learn how Fingerprint can help streamline your site experience.