Browser fingerprinting is a technique that involves collecting varied information about someone's browser or device—such as device model, operating system, browser type and version, screen resolution, and CPU specifications—and combining them to create a unique digital identifier called a fingerprint.
Websites can use this fingerprint to identify visitors, which is useful for fraud detection and prevention. For example, think about someone logging onto your bank account. With browser fingerprinting (and your credentials), the website can determine that this isn't the browser that you typically use and then offer two-factor authentication or an OTP to ensure that it's indeed you trying to log in from a different device.
In this article, you'll learn how to use Fingerprint Pro to generate unique identifiers for your site's visitors using Node.js, an open-source, cross-platform JavaScript runtime environment. You will implement a user registration system that limits the number of signups from the same browser in a certain time range. Fingerprint Pro will help identify the user’s browser.
Prerequisites
You'll need a few things to follow along:
- A Fingerprint Pro account
- Node.js installed on your local machine
- A code editor and a web browser
Set Up Your Project
To start, create a project folder, open it in your terminal, and execute the following command to initialize a Node.js application:
npm init -yNext, execute the following command to install all the required dependencies:
npm i express ejs sqlite3 sequelize bcrypt @fingerprintjs/fingerprintjs-pro-server-apiexpresslets you create a web application with Node.js.ejslets you implement JavaScript templates for the frontend.sqlite3lets you create and interact with an SQLite database.sequelizelets you interact with the SQLite database using JavaScript.bcryptlets you hash passwords before storing them.@fingerprintjs/fingerprintjs-pro-server-apilets you interact with the Fingerprint Server API.
Implement the Frontend
In the project root directory, create a new folder named views. Create a new file named register.ejs in this folder and add the code below to it:
<!DOCTYPE html>
<html lang="en">
  <head>
    <meta charset="UTF-8" />
    <meta name="viewport" content="width=device-width, initial-scale=1.0" />
    <title>Register</title>
    <style>
      body {
        margin: 0;
        padding: 0;
        box-sizing: border-box;
        display: flex;
        justify-content: center;
        align-items: center;
        height: 100vh;
        background-color: #f4f4f4;
      }

      .form-container {
        background-color: white;
        border-radius: 5px;
        box-shadow: 0 2px 5px rgba(0, 0, 0, 0.1);
        width: 24rem;
        padding: 2rem;
      }

      .form-group {
        margin-bottom: 15px;
        width: 100%;
      }

      input {
        width: 100%;
        padding: 8px;
        border: 1px solid #ccc;
        border-radius: 3px;
      }

      button {
        padding: 10px 20px;
        background-color: #007bff;
        color: #fff;
        border: none;
        border-radius: 3px;
        cursor: pointer;
      }

      button:disabled {
        background-color: #ccc;
        cursor: not-allowed;
      }

      .error {
        font-size: small;
        color: red;
      }
    </style>
  </head>
  <body>
    <div class="form-container">
      <h2>Register</h2>
      <% if (typeof errors !== 'undefined') { %> <%
      errors.forEach(function(error) { %>
      <p class="error"><%= error %></p>
      <% }); %> <% } %>
      <form action="/register" method="POST" style="width: 100%;">
        <div class="form-group">
          <label for="email">Email:</label>
          <input type="email" id="email" name="email" value="" required />
        </div>
        <div class="form-group">
          <label for="password">Password:</label>
          <input
            type="password"
            id="password"
            name="password"
            value=""
            required
          />
        </div>
        <input type="hidden" id="requestId" name="requestId" />
        <input type="hidden" id="visitorId" name="visitorId" />
        <div class="form-group">
          <button type="submit" id="submitBtn" disabled>Register</button>
        </div>
      </form>
    </div>

    <script>
      // Initialize the agent once at web application startup.
      // Alternatively initialize as early on the page as possible.
      const fpPromise = import("https://fpjscdn.net/v3/PUBLIC_API_KEY").then(
        (FingerprintJS) => FingerprintJS.load()
      );

      // Analyze the visitor when necessary.
      fpPromise
        .then((fp) => fp.get())
        .then(({ requestId, visitorId }) => {
          // Set the values for the hidden form elements
          document.getElementById("requestId").value = requestId;
          document.getElementById("visitorId").value = visitorId;

          // Enable the submit button
          document.getElementById("submitBtn").disabled = false;
        });
    </script>
  </body>
</html>
This code renders a simple registration form with two visible fields for the email and password and two hidden fields. The code has a script tag that contains code for initializing the Fingerprint JavaScript agent using the CDN.
Two important methods are used to initialize the agent: import() downloads the JavaScript agent, and load() returns a promise that resolves to an instance of the agent.
After an agent instance has been acquired, the get() method sends an identification request for the current site visitor to the Fingerprint API. This method returns an object with four values:
requestIdis a unique identifier for every request made to the Fingerprint API. It can be used to request information about a specific identification request from the server API.visitorIdis the unique identifier for the site visitor's browser/device.visitorFoundindicates if the visitor has been identified globally across all Fingerprint apps before.confidenceis a number between 0 and 1 that represents the probability of accurate identification.
The code extracts the visitorId and the requestId from the returned object, and these IDs are then used to populate two hidden input fields in the HTML form.
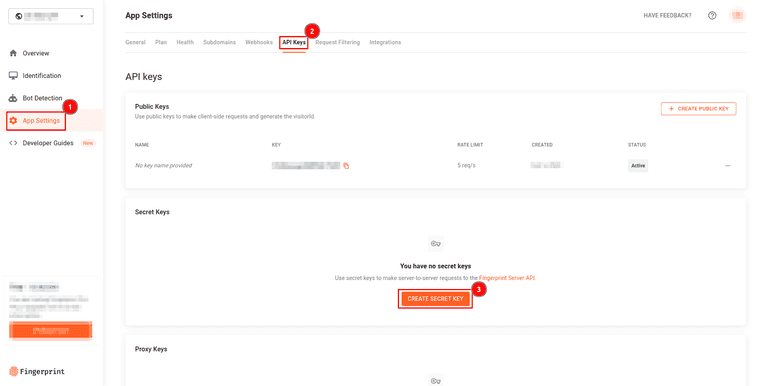
Note: Remember to replace PUBLIC_API_KEY with your unique public API key, which you can get from the Fingerprint dashboard in App Settings > API keys.

Next, create a file named dashboard.ejs in the views folder and add the code below to it:
<!DOCTYPE html>
<html lang="en">
  <head>
    <meta charset="UTF-8" />
    <meta name="viewport" content="width=device-width, initial-scale=1.0" />
    <title>Dashboard</title>
    <style>
      body {
        margin: 0;
        padding: 0;
        box-sizing: border-box;
        display: flex;
        justify-content: center;
        align-items: center;
        height: 100vh;
        background-color: #f4f4f4;
      }

      .dashboard-container {
        background-color: #fff;
        padding: 20px;
        border-radius: 5px;
        box-shadow: 0 2px 5px rgba(0, 0, 0, 0.1);
        text-align: center;
      }
    </style>
  </head>
  <body>
    <div class="dashboard-container">
      <h2>Account created successfully</h2>
      <h4>Welcome to the dashboard!</h4>
    </div>
  </body>
</html>
This code renders a simple HTML page that the site visitor will be navigated to once they create an account.
Implement the Server Logic
With the front end ready, you can move on to implementing the server logic.
First, create a new file named db/database.db in the project root folder. It will act as the SQLite database for this application.
Next, create a file named server.js in the project root folder and add the code below to it:
const express = require("express");
const sqlite3 = require("sqlite3").verbose();
const fingerprintJsServerApi = require("@fingerprintjs/fingerprintjs-pro-server-api");
const { Sequelize, Op } = require("sequelize");
const bcrypt = require("bcrypt");
const UserModel = require("./models/User");
const DeviceFingerprintModel = require("./models/DeviceFingerprint");

const app = express();
const PORT = 5000;

// Initialize the Fingerprint Server API client instance
const client = new fingerprintJsServerApi.FingerprintJsServerApiClient({
  apiKey: "SECRET_API_KEY",
  region: fingerprintJsServerApi.Region.Global,
});

// Initialize sequelize with SQLite database connection
const sequelize = new Sequelize({
  dialect: "sqlite",
  storage: "./db/database.db",
});

// Create model instances
const User = UserModel(sequelize);
const DeviceFingerprint = DeviceFingerprintModel(sequelize);

// Set the view engine to ejs
app.set("view engine", "ejs");

// Parse URL-encoded bodies
app.use(express.urlencoded({ extended: true }));

// Define routes
// Display the registration page
app.get("/register", (req, res) => {
  res.render("register");
});

// Display the dashboard
app.get("/dashboard", (req, res) => {
  res.render("dashboard");
});

// Function to start the server
function startServer() {
  app.listen(PORT, () => {
    console.log(`Server is running on http://localhost:${PORT}`);
  });
}

(async () => {
  await sequelize.sync({ alter: true });

  console.log("Model synchronized successfully");

  startServer();
})();
This code sets up a web application using the Express framework with two routes to display the registration and dashboard pages. Additionally, it connects to the SQLite database using the Sequelize ORM. It also initializes the Fingerprint Server API client instance that you will use to interact with the Fingerprint Server API. The server is started once the database models are synchronized. You will create the User model in the next step.
In the client initialization, the region is set to fingerprintJsServerApi.Region.Global, which means your Fingerprint application is deployed in the Global region. There are three regions where you can deploy your Fingerprint app:
| Region | Base URL | Server Location |
|---|---|---|
| Global | https://api.fpjs.io | Global |
| EU | https://eu.api.fpjs.io | Frankfurt, Germany |
| Asia (Mumbai) | https://ap.api.fpjs.io | Mumbai, India |
Make sure you update the code to match your app's region, which you set up when creating your Fingerprint application.
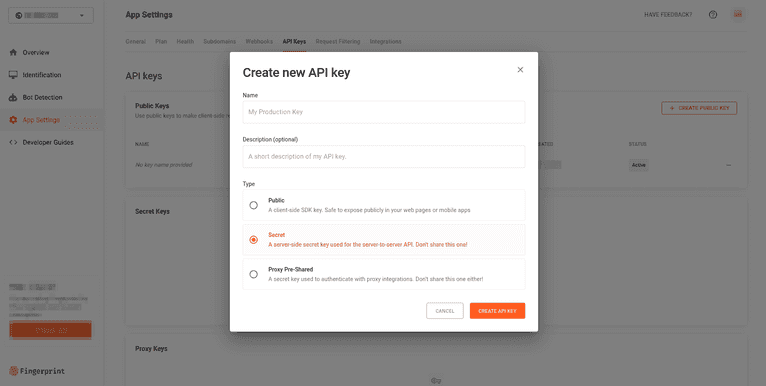
Again, remember to replace SECRET_API_KEY with the value of your key, which you can obtain from the Fingerprint Pro dashboard in App Settings > API keys > CREATE SECRET KEY.

In the Create new API key dialog box, provide a name for your key (eg Test Key) and select Secret as the type of key.

To define the User model that you imported in the previous step, create a new file named models/User.js in the project root folder and add the code below to it.
const { DataTypes } = require("sequelize");

module.exports = (sequelize) => {
  const User = sequelize.define("User", {
    id: {
      type: DataTypes.INTEGER,
      primaryKey: true,
      autoIncrement: true,
    },
    email: {
      type: DataTypes.TEXT,
      allowNull: false,
      unique: true,
    },
    password: {
      type: DataTypes.TEXT,
      allowNull: false,
    },
  });

  return User;
};
This code exports a function that defines a Sequelize model named User with the relevant fields: id, email, and password. The email field is set to be unique, which means that only one email address can be associated with a user. Finally, the function returns the User model definition.
You also need to create the DeviceFingerprint model that you imported earlier. To do this, create a new file named models/DeviceFingerprint.js in the project root folder and add the code below to it.
const { DataTypes } = require("sequelize");

module.exports = (sequelize) => {
  const DeviceFingerprint = sequelize.define("DeviceFingerprint", {
    id: {
      type: DataTypes.INTEGER,
      primaryKey: true,
      autoIncrement: true,
    },
    fingerprint: {
      type: DataTypes.TEXT,
      allowNull: false,
    },
  });

  // Define association to User model
  // One device fingerprint can belong to multiple Users
  DeviceFingerprint.hasMany(sequelize.models.User, {
    foreignKey: "fingerprintId",
  });

  return DeviceFingerprint;
};
This code exports a function that defines a Sequelize model named DeviceFingerprint with the relevant fields: id and fingerprint. The fingerprint field stores the user’s device fingerprint. Additionally, it establishes an association with the User model, indicating that one device fingerprint can belong to multiple users.
Next, you need to add a route that handles the registration process. In this route, you will perform some additional validations to ensure that the fingerprint generated on the front end is reliable.
The Fingerprint Server API allows you to perform several validations to ensure the reliability of the generated device/browser fingerprint. In this tutorial, you'll only implement the following validations:
- The visitor ID from the Fingerprint Server API must match the one in the request body. This helps prevent potential forgery attempts where the user might be trying to send a fake visitor ID.
- The time between the identification timestamp and the request timestamp must be less than 120 seconds. (This value is only for illustrative purposes and can be changed to match your preferences.) A restraint like this reduces the likelihood of malicious actors intercepting and replaying identification data.
- The user must not be a bot. Bots are often used to obtain unauthorized access, and this validation also helps with disruptive activities, such as scraping that results in overwhelming traffic.
To add these validations, add the following route to your code in the server.js file:
app.post("/register", async (req, res) => {
  const validateInput = async (requestId, visitorId) => {
    // Make a request to the Fingerprint Server API
    const eventData = await client.getEvent(requestId);

    // Define an errors array
    const errors = [];

    // Make sure the visitor ID from the server API matches the one in the request body
    if (eventData.products.identification.data.visitorId !== visitorId) {
      errors.push("Forged visitor ID");
    }

    // The time between the server identification timestamp and the request timestamp should be less than 120 seconds
    let timeDiff = Math.floor(
      (new Date().getTime() -
        eventData.products.identification.data.timestamp) /
        1000
    );
    if (timeDiff > 120) {
      errors.push("Forged request ID");
    }

    // Make sure the user is not a bot
    if (eventData.products.botd.data.bot.result === "bad") {
      errors.push("Bot detected");
    }

    return {
      errors,
      fingerprint: eventData.products.identification.data.visitorId,
    };
  };

  const createUser = async (email, password, fingerprint) => {
    try {
      // Check if the fingerprint already exists
      let existingFingerprint = await DeviceFingerprint.findOne({
        where: { fingerprint },
      });

      // If the fingerprint doesn't exist, create a new one
      if (!existingFingerprint) {
        existingFingerprint = await DeviceFingerprint.create({ fingerprint });
      }

      // Check if the fingerprint was added in the last 30 minutes
      const thirtyMinutesAgo = new Date(Date.now() - 30 * 60 * 1000); // 30 minutes ago

      const signupsWithinLastThirtyMinutes = await User.count({
        where: {
          fingerprintId: existingFingerprint.id, // Use the ID of the existing fingerprint
          createdAt: {
            [Op.gt]: thirtyMinutesAgo, // Check if signup timestamp is greater than thirty minutes ago
          },
        },
      });

      console.log("Number of signups", signupsWithinLastThirtyMinutes);

      // Check if more than a certain number of signups have occurred within the last 30 minutes
      const maxSignupsAllowed = 1; // Only one signup is allowed every 30 minutes
      if (signupsWithinLastThirtyMinutes >= maxSignupsAllowed) {
        // Handle the condition where more than the allowed number of signups occurred within the last 30 minutes
        return res.render("register", {
          errors: [
            "Unable to create account. Only one account can be created every 30 minutes.",
          ],
        });
      }

      // Hash the password
      let hashedPassword = await bcrypt.hash(password, 10);

      // Save the user with the existing fingerprint reference
      await User.create({
        email,
        password: hashedPassword,
        fingerprintId: existingFingerprint.id,
      });

      // Redirect the user to the dashboard upon successful registration
      res.redirect("/dashboard");
    } catch (error) {
      // Handle error appropriately
      if (error.name === "SequelizeUniqueConstraintError") {
        res.render("register", {
          errors: ["Looks like you already have an account. Please log in."],
        });
      } else {
        console.error("Error inserting user:", error);
      }
    }
  };

  // Extract request data
  const { email, password, requestId, visitorId } = req.body;

  // Perform validation
  const validation = await validateInput(requestId, visitorId);

  // Render appropriate errors
  if (validation.errors.length > 0) {
    return res.render("register", { errors: validation.errors });
  }

  // Create user
  createUser(email, password, validation.fingerprint);
});
The code above defines two functions: validateInput, which checks the validity of the provided user data by querying the Fingerprint Server API, and createUser, which attempts to create a new user in the database.
The validateInput function makes an asynchronous request to the Fingerprint Server API to retrieve event data associated with the provided requestId. It initializes an empty errors array to store any validation errors encountered during the validation process.
The function uses if statements to perform the validations mentioned before:
- It checks if the
visitorIdfrom the server API response matches the one provided in the request body. If not, it indicates a potentially forged visitor ID and adds an error to theerrorsarray. - It calculates the time difference between the visitor identification timestamp and the current time. If the difference exceeds 120 seconds, it adds an error indicating a potentially forged request ID to the
errorsarray. - It checks if the Fingerprint Server API detects that the user is a bot. If so, it adds an error indicating bot detection to the errors array.
Note that the error handling logic implemented here is only for illustrative purposes to show the sample responses you can receive from the Fingerprint Server API. In a real-world application, you could include logic like showing a captcha if you detect that the user is a bot, prompting the user for two-factor authentication if the browser fingerprint doesn’t match the one in the database, and so on.
The validateInput function finally returns the errors and the device fingerprint.
The createUser function is responsible for creating a new user in the database. It first checks if the provided fingerprint exists in the database and creates it if it doesn’t. It then checks the number of signups associated with this fingerprint within the last thirty minutes using the User model’s count method, filtering by the fingerprintId and createdAt fields. If the count exceeds the maximum allowed signups(1) within the timeframe, it renders an error message. Otherwise, it creates a new user with a reference to the existing fingerprint and redirects the user to the dashboard.
Lastly, the route extracts the required info from the request object and calls the validateInput function to validate the data. If the validate function returns any errors, the register page is rendered with the appropriate errors. If no errors are returned, the createUser function is called with the appropriate data to add the new user to the database.
Test the Application
To test if your application is working as expected, execute the following command in the terminal to run the server:
node server.jsNavigate to http://localhost:5000/register on your browser, where you'll see the registration page:

The Register button will be disabled while the Fingerprint Server API is generating a unique identifier for the current site visitor. Once the button is enabled, sign up and click it to be navigated to the dashboard page:
Note: If you have an ad blocker installed, the button may remain disabled if the ad blocker is blocking requests to the Fingerprint domains. In this case, you need to disable the ad blocker on this web page to test the application. If you want a more advanced solution for bypassing ad blockers, check out how to protect the Fingerprint JavaScript agent from ad blockers.

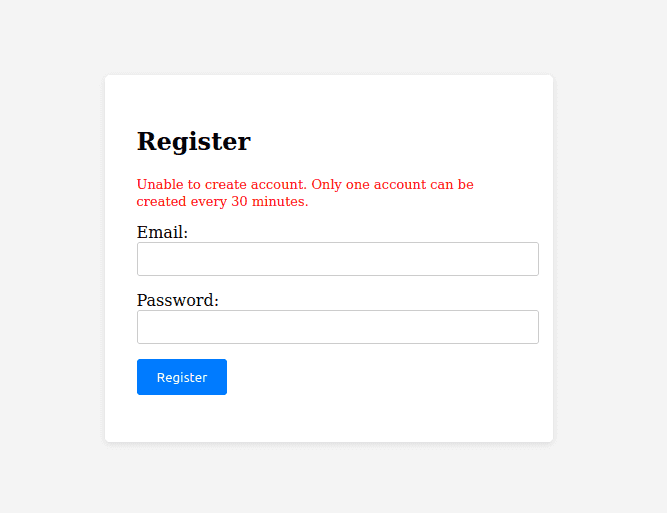
If you navigate to http://localhost:5000/register and try to register an account with a different email address before thirty minutes are over, the account will not be created because you set up the server to allow creating only one account every thirty minutes from the same device:

You can access the full code for this project here.
Conclusion
As you can tell from this tutorial, browser fingerprinting is invaluable in detecting and preventing online fraud.
For instance, if your site offers free trials for a service, you can use browser fingerprinting to limit the number of accounts created from a browser in a certain period. You can also block bots and suspicious users or apply extra authentication steps if they're detected to protect your site against cyberattacks.
Fingerprint Pro can identify users with industry-leading accuracy. Sign up for a free trial to test it for yourself.
FAQ
Browser fingerprinting is a method to uniquely identify website users by analyzing details about their web browsers to generate an identifier. This information can include details like browser version, screen resolution, and installed fonts to uniquely identify a user's device.
Adding browser fingerprinting to your app can enhance security by detecting and preventing fraudulent activities. It can also be used to improve user experience by enabling personalized settings without requiring logins.
Browser fingerprinting provides a much more persistent form of visitor identification than cookies, which users can easily clear or block. It allows for effective identification and fraud detection capabilities even with stricter privacy settings and cookie restrictions.


